Installation Walkthrough
⏱ 7 min read
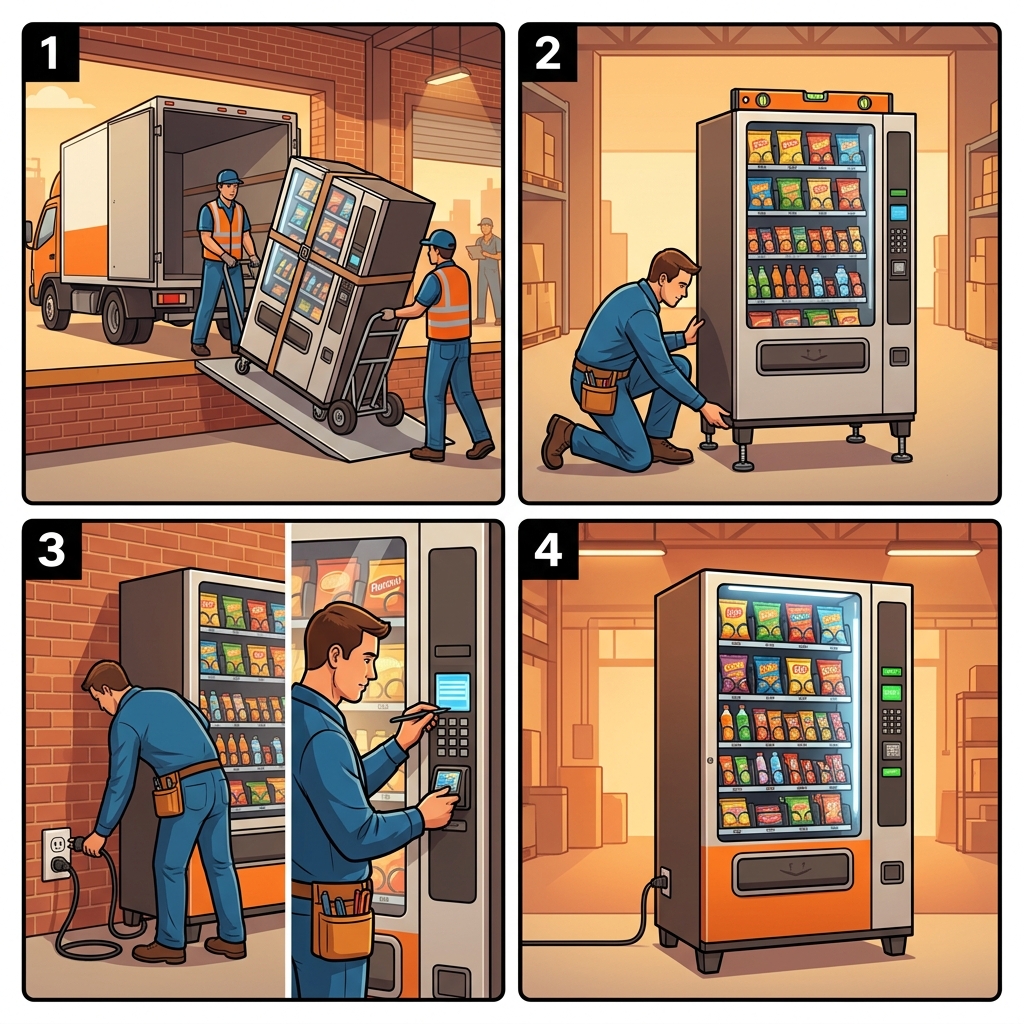
Four-step installation: unload and position, level the machine, connect power and configure payments, stock and test every selection.
From Delivery to First Sale: Installation Blueprint
Successfully installing a vending machine requires careful logistics and strict safety compliance. If you do not prepare the location properly, you risk damaging the property, injuring yourself, or burning out the machine's compressor. This lesson provides a comprehensive installation walkthrough, details electrical and clearance requirements, lists the essential day-of tools, details safety hazards, and outlines the troubleshooting protocols for common installation failures.
1. Pre-Installation Electrical & Space Requirements
Before the delivery truck arrives, you must verify the electrical outlet at the location matches your machine's specs:
- Voltage & Amperage: Standard combo and beverage machines require a standard 115V AC, 15-amp or 20-amp grounded outlet.
- Dedicated Circuit: Vending machines draw significant power when the refrigeration compressor cycles on. Avoid outlets shared with high-draw office equipment (like laser printers, microwaves, or copiers). A shared circuit will trip the breaker, turning off your machine and spoiling your inventory.
- GFCI Protection: If the machine is outdoors or in a damp warehouse area, it must be plugged into a GFCI (Ground Fault Circuit Interrupter) outlet to prevent electrical shock.
- Extension Cords: Never use standard household extension cords. If you must use an extension cord, it must be a heavy-duty, commercial-grade 12-gauge grounded cord, and it should not exceed 10 feet in length to avoid voltage drops that damage the compressor motor.
- Clearance Requirements: Always maintain at least 4 to 6 inches of space between the back of the machine cabinet and the wall. This gap allows the hot air generated by the refrigeration coils to circulate out. Pushing a machine flush against a wall traps heat, causing the compressor to run continuously and burn out.
2. Step-by-Step Installation Walkthrough
Follow this protocol on installation day to ensure a smooth, safe setup:
Step 1: Positioning and Leveling
Carefully wheel the machine into place using an appliance dolly. Once in position, place a spirit level on top of the cabinet. Use a wrench to adjust the heavy threaded leveling legs at the bottom corners. A machine that is not level will experience coin validation errors and product vending jams because the internal trays and drop chute are designed to operate perfectly plumb.
Step 2: The 24-Hour Settling Period
CRITICAL RULE: Once the machine is positioned, plug it in to test the lights and motherboard, but do not turn on the refrigeration system for 24 hours.
During transport, the oil in the compressor tilts and flows into the cooling lines. If you start the compressor immediately, it will run without lubrication and seize up. Let the machine sit upright for 24 hours to allow the compressor oil to drain back into the reservoir.
Step 3: Programming Prices and telemetries
After the settling period, turn on the cooling system. Access the service menu using the yellow or blue button on the motherboard. Set the price for each selection slot. Mount your cashless reader, route the antenna to the top of the machine, and run a test transaction to verify the processor merchant account is active.
Step 4: Loading and Stocking
Load inventory from back to front. Ensure products slide freely within the metal coils. Double-check that expiration dates are facing backward (so older items sell first) and product labels face forward toward the glass.
3. Safety Hazards & Seismic Anchoring
Vending machines are top-heavy and represent significant physical hazards if improperly secured:
- Tipping Hazards: A loaded combo machine weighs between 800 and 1,000 pounds. If a customer shakes the machine to dislodge a product, it can tip forward, causing severe injury or death.
- Seismic Brackets & Anchoring: In high-risk public locations (such as schools, universities, or earthquake-prone zones like California), you must secure the machine to the wall or floor. Use commercial seismic anchor brackets bolted directly into the concrete wall studs behind the machine cabinet.
- Warning Decals: Mount a visible warning label near the coin slot stating: "DANGER: Do not shake or tilt machine. Severe injury or tipping hazard."
4. Day-of-Installation Packing List
Ensure your vehicle is loaded with these items before heading to the location:
- Heavy-duty appliance dolly with safety straps (rated for 800+ lbs)
- Spirit level (torpedo level)
- Adjustable wrench and socket set (for leveling legs and bracket mounting)
- Phillips and flathead screwdrivers
- Multimeter (to verify outlet voltage and ground connection)
- Windex and microfiber cleaning towels (to wipe down the glass and cabinet)
- Cashless card reader, antenna, zip ties, and mounting hardware
- $50 in small bills and coins (quarters, dimes, nickels) to load the change tubes
- Initial inventory sorted in protective plastic totes
- Custom business cards or service decals with your contact info
5. Diagnostics & Spiral Configuration Tests
Before stocking the shelves, you must run physical mechanical tests:
- Motherboard Motor Test: Access the motherboard diagnostic menu and select "Test All Motors". Watch each spiral rotate exactly 360 degrees and return to its home position.
- Home Switch Troubleshooting: If a motor fails to stop after a full turn and keeps spinning, it is suffering from a failed home switch connection. Check the wires at the back of the tray; a loose wire hookup is the cause 90% of the time.
- Trimming Spiral Alignment: Adjust the angle of the wire coils so the product sits flat. If the coil ends too high, it will pinch the item, causing a vend jam on the first rotation.
6. Cleanliness, Sanitation & Coil Maintenance
Keeping your machine clean ensures long-term operational health and high impulse sales:
- Condenser Coil Dusting: Vacuum the refrigeration condenser coils at the bottom of the machine every 6 months. Dusty coils insulate heat, forcing the compressor to run 30% longer and causing premature compressor failure. Use a heavy-duty coil brush or compressed air canister to blow out the fins.
- Acceptor Path Cleaning: Clean the optical lenses inside your bill validator and coin acceptor paths monthly. Use a microfiber cloth dipped in rubbing alcohol to wipe away dirt, dust, and grease left by thousands of fingers and bills.
- Bin Sanitation: Wipe out the product drop bin weekly with a non-toxic sanitizer to remove residues from exploded beverage cans or candy leaks.
- Condensation Drain Line Clearing: Vending machine refrigeration systems produce condensation as they cool. This moisture drips into a drain pan below the compressor. Over time, dust, algae, and slime can clog the drain line hole, causing water to overflow and pool at the bottom of the machine cabinet. This pools of water rusts the cabinet floor, rots cardboard snack packaging on the bottom tray, and creates an electrical hazard. During every bi-monthly maintenance sweep, check the drain pan and blow out the condensation drain tube using a flexible wire brush or a blast of compressed air to prevent standing water accumulation.
7. Post-Installation Verification Protocol
Before leaving the location, run these five checks:
- Temperature Stability Check: Let the cooling unit run for 4 hours. Verify the internal thermometer reads stable between 36°F and 40°F.
- MDB Signal Sweep: Check the diagnostics logs on your Nayax or Cantaloupe interface. Ensure the status reads "Online" and peripheral communications are active.
- Bill Validator Acceptance: Insert five clean $1 bills, a $5 bill, and a crumpled $1 bill. Ensure they slide in smoothly and register as credit.
- Coin Payout Test: Buy a cheap selection and verify the correct change is dropped from the coin tubes into the coin return cup.
- LED Lighting Lux Check: Check that all shelves are evenly illuminated with no shadows or flickering bulbs.